Howto: Fix MySQL Server dependency problems on Ubuntu LTS

Have you encountered this error?

An error occurred while setting the password for the MySQL administrative user.
This may have happened because the account already has a password, or because of a
communication problem with the MySQL server.

Or maybe seen this?

Errors were encountered while processing:
mysql-server-5.5
mysql-server

Or this?


dpkg: error processing package mysql-server (--configure):
dependency problems - leaving unconfigured

This is a total bastard of a problem. Here’s what worked for me:

sudo apt-get purge mysql-server mysql-client mysql-common mysql-server-5.5
sudo dpkg --purge mysql*
sudo rm -rf /etc/mysql
sudo apt-get install -f
sudo dpkg --configure -a
sudo apt-get update
sudo apt-get upgrade
sudo apt-get dist-upgrade
sudo apt-get autoremove
sudo apt-get autoclean
sudo apt-get install mysql-server
sudo reboot

Purge everything that even looks like mysql. Remove the /etc/mysql directory manually, because mysql-common is going to try to hide there. Fix any broken dependencies and reconfigure any broken packages. You may get the same error again when trying to reinstall mysql-server. I threw up my hands and went to bed at that point, woke up this morning deciding to finally learn PostgreSQL, got this error:

E: Could not get lock /var/lib/dpkg/lock - open (11: Resource temporarily unavailable)

and believe it or not, a reboot fixed the problem for me. mysqld started on reboot. I rubbed my eyes, and wrote this post in case it ever bloody well happens again.

How to read from the Assets folder in an Eclipse Android application

Seeing errors like these?


java.io.FileNotFoundException
at android.content.res.AssetManager.openAsset(Native Method)
at android.content.res.AssetManager.open(AssetManager.java:315)
at android.content.res.AssetManager.open(AssetManager.java:289)

The problem is that Eclipse isn’t finding your file, because you may not be using AssetManager to retrieve plain-text files from the assets folder. Here’s how to fix this:

  1. Note that there is no file extension on text. When I pasted ‘text.txt’ into the Assets folder to begin with, it had no extension. I tried and tried to get the app to recognize that Assets had a text.txt file in there, and finally tried it with no file extension as it appeared in the folder view.
  2. The try/catch AND the throws declaration are necessary to handle Eclipse’s fiddly compiler.
  3. Don’t cry. If you still can’t figure out how to get Eclipse buy kamagra online
    and your app to read the file, clean the project (Project –> Clean), make sure that the Assets folder is NOT on the build path, restart Eclipse, ensure you have no other errors (ADB, DDMS, anything), and try again. If it still doesn’t work, comment here and I’ll both try to help and make updates to the code.


public void openFile () throws IOException {
System.out.println("Starting openFile now");
AssetManager am = context.getAssets();
try {
InputStream is = am.open("text");
BufferedReader in = new BufferedReader(new InputStreamReader(is));
String inputLine;
while ((inputLine = in.readLine()) != null)
System.out.println(inputLine);
in.close();
} catch (IOException e) {
e.printStackTrace();
}
}

Useful links (none of which contain the entire solution, but all of which had some piece):

http://stackoverflow.com/questions/6039862/location-of-apk-file
http://stackoverflow.com/questions/5086539/reading-file-from-assets-directory-throws-filenotfoundexception
http://developer.android.com/reference/android/content/res/AssetManager.html
http://developer.android.com/reference/java/io/InputStream.html
http://stackoverflow.com/questions/5771366/reading-a-simple-text-file
http://stackoverflow.com/questions/10267594/how-to-access-
assets-folder-in-my-android-app

http://stackoverflow.com/questions/9674815/trouble-with-reading-file-from-assets-folder-in-android

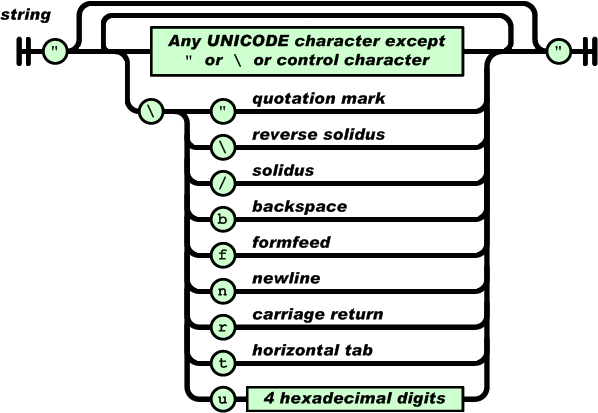
Which JSON library should I use in my Android and Java projects?

JSON.org is where you start; this is the prepackaged JSON found in Oracle and Open Java Development Kits. The home page is a useful resource to see all the different JSON libraries out there for all different languages.

GSON is most useful for converting Java objects into their JSON representation. The Google libs can also convert a JSON representation into a Java object; this can be a game-changer for dealing with inheritance.

FlexJSON has a serious strength in web development. Because you can specify deep or shallow copies of objects, you can speed up transmission of information from backend Java code to your front end and client-facing architecture.

Jackson is almost certainly
the fastest JSON parsing library out there; it’s an active project, and has speed and flexibility to recommend it. I have started using it by default. Most useful is the fact that you can switch between a tree model and object mapping at will. It has a JSONFactory method that is extremely useful when parsing and manipulating JSON representations that need to be read, processed, and rewritten to provide data to an Android app.

JSON-lib is mostly focused on translation. Need to translate objects and data back and forth between Java objects, beans, servlets, and DynaBeans? This is the lib to use. Notably, it’s a bit heavy, as you might expect from a translation-centric library, so it’s probably best used when you’re managing legacy code or are a one-woman-shop.

How To Build A Ruby Server With RVM On Kubuntu 12.10

So I’m building a Ruby server right now for the first time. I’m going to list out here the resources I used as a skilled web dev to get this up and running right away. These links do assume that you know what you’re doing in the cloud, but if so, they’re the best way to get running fast.

http://guides.rubyonrails.org/getting_started.html
https://www.digitalocean.com/community/articles/how-to-install-ruby-on-rails-on-ubuntu-12-04-lts-precise-pangolin-with-rvm
This is the best link: http://www.andrehonsberg.com/article/install-rvm-ubuntu-1204-linux-for-ruby-193

And here are the steps:
n
Update, upgrade, dist-upgrade
ufw default deny and add 80 and ssh port
apt-get install build-essential http://ambienbuy.net git-core curl
bash -s stable < <(curl -s https://raw.github.com/wayneeseguin/rvm/master/binscripts/rvm-installer) echo '[[ -s "/home/andre/.rvm/scripts/rvm" ]] && source "/home/andre/.rvm/scripts/rvm"' >> ~/.bashrc
source ~/.bashrc
sudo apt-get install libsqlite3-dev
rvm pkg install zlib
rvm reinstall $(rvm list strings | tr "\n" ',')
rvm reinstall 1.9.3 --with-openssl-dir=/usr/local
rvm all-gemsets do rvm gemset pristine
gem install sqlite3-ruby -- --with-sqlite3-dir=/usr/local/lib
rvm gemset create rails31
rvm gemset use rails31
rvm current
gem list
echo "gem: --no-rdoc --no-ri" > ~/.gemrc
rvm pkg install openssl
sudo apt-get install -y libssl-dev
rvm reinstall $(rvm list strings | tr "\n" ',')
rvm all-gemsets do rvm gemset pristine
gem install rails
bundle install
rails new NewProject -d sqlite3
echo "gem '
therubyracer'" >> Gemfile

HOWTO: set up a cloud server with WordPress at Rackspace

You’re probably here because you are finally at the point where you need root access to your web server so that you can install applications like MediaWiki or WordPress or Joomla or any other CMS. If you have a website that you want to move away from a hosted environment, this is how to set yourself up so that you control every aspect of your site.

    1. Create an account at Rackspace.com. Go to Cloud Servers and create a new server. If you need help with this, though it’s very self-explanatory and easy on their site, you can always chat with their 24-7 online chat support. Note the administrative password and the IP address of the server you have created.
    2. Open a bash terminal and SSH into your shiny new server. “ssh root@YOURSERVERSIPADDRESS”. Enter the password.
    3. Create a user for yourself. “useradd -m -s /bin/bash yourname” and create a password for yourself  “passwd yourname”.
    4. Enter “su
      yourname”. Now, you are logged in under your name and not as root.
    5. Enter the following:
      sudo apt-get update
      sudo apt-get upgrade
      sudo apt-get install tasksel
      sudo tasksel install lamp-server
      sudo apt-get install php-mail python-software-properties unzip
      sudo a2enmod rewrite
      sudo apt-get autoclean
      sudo apt-get autoremove
      mkdir /home/yourname/yourwebsitename
      mkdir /home/yourname/yourwebsitename/blog
      cd /home/yourname/yourwebsitename/blogsudo
      wget http://wordpress.org/latest.tar.gz
      sudo tar -zxvf latest.tar.gz .
    6. That has cleaned up your server and installed a web server as well as WordPress. Enter passwords for your MySQL database and record them.
    7. “sudo service apache2 restart” #You will get an error that local server has not been set up.
      echo “ServerName localhost” | sudo tee /etc/apache2/conf.d/$servername
      sudo service apache2 restart #Should be no error now
    8. r

    9. cd /etc/apache2/sites-available/
      sudo nano yourwebsitename
    10. Copy this with CTRL+SHIFT+V into the terminal:
    11. ServerAdmin webmaster@localhost
      ServerName www.yourwebsitename.com
      ServerAlias yourwebsitename.com *.yourwebsitename.com
      DocumentRoot /home/yourname/yourwebsitename/
      php_value upload_max_filesize 1M

      Options +FollowSymLinks
      AllowOverride All
      Order allow,deny
      allow from all

      Options Indexes FollowSymLinks MultiViews
      AllowOverride All
      Order allow,deny
      allow from all

      ScriptAlias /cgi-bin/ /usr/lib/cgi-bin/

      AllowOverride None
      Options +ExecCGI -MultiViews +SymLinksIfOwnerMatch
      Order allow,deny
      Allow from all

      ErrorLog ${APACHE_LOG_DIR}/error.log

      # Possible values include: debug, info, notice, warn, error, crit,
      # alert, emerg.
      LogLevel warn

      CustomLog ${APACHE_LOG_DIR}/access.log combined

      Alias /doc/ “/usr/share/doc/”

      Options Indexes
      MultiViews FollowSymLinks
      AllowOverride None
      Order deny,allow
      Deny from all
      Allow from 127.0.0.0/255.0.0.0 ::1/128


    12. CTRL+X and save the file as yourwebsitename.com.
    13. cd /etc/apache2/sites-enabled/

sudo ln -s /etc/apache2/sites-available/yourwebsitename.com /etc/apache2/sites-enabled/yourwebsitename.com
sudo service apache2 restart

    1. Where have you created your domain name account? If it’s with GoDaddy, login to your GoDaddy account and click on Domain Manager. Click on the website name and enter the dashboard (or follow whatever practice your domain registrar uses to get to where you can edit the zone file). Click on “Edit Zone File”.
    2. Replace the IP address in the zone file with the IP address of your cloud server. Save the zone file.
    3. “nano /home/yourname/yourwebsitename/index.php” and copy this into the file.

/**
*
Front to the WordPress application. This file doesn't do anything, but loads
* wp-blog-header.php which does and tells WordPress to load the theme.
*
* @package WordPress
*//**
* Tells WordPress to load the WordPress theme and output it.
*
* @var bool
*/
define('WP_USE_THEMES', true);

/** Loads the WordPress Environment and Template */
require(‘./blog/wp-blog-header.php’);
?>;

  • In a few minutes, you should be able to enter your URL into any browser, and see the WordPress installation page. Install using the database name and password you’ve created in PHPMyAdmin or in command line for MySQL.
  • I recommend Elegant Themes to get a beautiful and professional look for your site instantly.


HOWTO: Always know your home computer’s IP address from anywhere using Dropbox

To always know what your home machine’s IP address is (and while I’ll assume that you’re running Kubuntu, this can be adapted using the following bash script to any machine).

  • Apt-get ‘kcron’.
  • Open Task Scheduler and set the following bash script to run every five minutes:
#!/bin/bash
J=`wget http://checkip.dyndns.org/ -qO - | grep -Eo '\<[[:digit:]]{1,3}(\.[[:digit:]]{1,3}){3}\>'`
K=`date`
echo "$J $K" >> ../Dropbox/ANYDIRECTORYYOUCHOOSE/output.txt
  • Ensure the script is executable, and test it in a shell.

Now, you can always see what your home computer’s IP address is in any browser window; I use this in case there are issues with SSHing into my home box.

How to move WordPress sites between cloud servers using Ubuntu 11.10 and PHPMyAdmin

Here’s a quick howto:

I use Rackspace as my cloud service; I was moving a few sites from one server using Ubuntu 10.04 LTS (Lucid Lynx) to a new one using 11.10 (Oneiric Ocelot). I hit a few issues, so I thought I’d tell you how to export a WordPress site in its entirety and move it between two LAMP servers.

  1. Open a file manager on your local machine, and open both remote locations.
  2. Copy the root and all files of the site to your new server in the same location.
  3. Copy the sites-available virtual host file from /etc/apache2/sites-available/ directory to the same location on your new server.
  4. Create the symbolic link in sites-enabled by changing into /etc/apache2/sites-enabled/ and using this command: “sudo ln -s /etc/apache2/sites-available/yourhostfile yourhostfile”.
  5. Open PHPMyAdmin for your old server in a browser window. Login, and open the database for the site you want to move.
  6. Go to the Export tab. Assuming you’re using UTF-8 encoding (and that’s a very safe bet), all you have to do is ensure that the Add DROP TABLE / VIEW / PROCEDURE / FUNCTION / EVENT box is checked under Structure, and that all options are highlighted in the Export box. Export the uncompressed database and save to a convenient location.
  7. Open PHPMyAdmin in your new server, login, and create a new database with the same name as the one you’re importing.
  8. Import the database you exported.
  9. Create a user on that database with the same name and password.
  10. Edit the DNS zone file for your site to point to the new IP address for your new server.
  11. SSH into your server, and use this command: “sudo service apache2 restart”.

Hit Ctrl+F5 once you think the DNS records will have propagated, and ensure it worked.


Third Edition Earthdawn Dice Roller in Java

So, I play an RPG called Earthdawn; it’s a lot like D&D, but for real nerds.

One of the things we all do in my gaming group is write our own dice rollers; rolling actual dice is SO passé–and there’s an ongoing argument about whether or not a seeded random is more or less random than the natural flaws in dice and rolling surfaces. Java is the language in which I learned to write math, so I somewhat naturally write algorithms in Java without thinking. It’s easy enough to translate this into C# or whatever.

Ok, so, here’s the algorithm. In Earthdawn, dice rolls are predicated on the step level of the difficulty. You may have an attack roll at step 18 and a damage roll at step 22. In 3rd edition Earthdawn, that translates to rolling d12+d10+d8 to attack, and 2d12+2d6 for damage. Here’s the chart (click to embiggen):

As you can see, there’s some kind of progression here; it turns out that the algorithm is a simple infinite series. There’s a jump in the number of dice every seven steps. Hence, the algorithm has a few simple steps:

(1) Divide the step number by 7.
(2) Determine and store the floor and the modulus.
(3) Roll a number of d12s equal to (floor – 1).
(4) Roll dice equal to the corresponding modulus (the first addition of dice past the 7 threshold will be 2d6, so if the modulus is 1, 2d6 are rolled and added).

That is the step algorithm such that no lookup is now necessary; Earthdawn has exploding dice and epic
fails, however, so two things are necessary. Look at the exploding dice method; if you roll the maximum value of a die, you can roll it again. You can keep rolling that die until a value shows that is less than the maximum value, such that a d6 rolled with a result of 6 can be rerolled. On the second roll, 6 results. On the third roll, 2 results, so the total value of that die roll is 14. For epic fails, if you roll more than one die and all dice show ones, you have epically failed (similar to a fumble in D&D, and with equivalent disastrous results).

Here’s my dice roller; click to embiggen:

So, here’s the code. It’s intended to be self-contained (you can see that I use a pic of Captain Malcolm Reynolds; just drop a pic in your file structure and reference it in the code if you want a background). Obviously this is bare-bones; you can adapt it at your leisure and to whatever GUI you desire. Any suggestions are welcome; I am always debugging this (and the JavaScript I’m using to display syntax highlighting is a little cranky, so forgive any indentation issues). If you can think of a way to optimize this algorithm, let me know; I always need bragging rights over the guys 😉

package dice;

import java.awt.Color;
import java.awt.Dimension;
import java.awt.Graphics;
import java.awt.GridLayout;
import java.awt.Image;
import java.awt.event.ActionEvent;
import java.awt.event.ActionListener;
import java.util.Random;

import javax.swing.BorderFactory;
import javax.swing.ImageIcon;
import javax.swing.JButton;
import javax.swing.JCheckBox;
import javax.swing.JFrame;
import 
javax.swing.JLabel;
import javax.swing.JOptionPane;
import javax.swing.JPanel;
import javax.swing.JSpinner;
import javax.swing.JTextField;
import javax.swing.SpinnerModel;
import javax.swing.SpinnerNumberModel;

@SuppressWarnings("serial")
public class ImagePanel extends JPanel implements ActionListener{

	int six = 6;
	int eight = 8;
	int ten = 10;
	int twelve = 12;
	int dice = 0; //counter for total number of dice
	
	public int middle; //step value entered by me.
	public boolean fail; //whether or not an epic fail happened.
	public JFrame frame;
	public Random r;
	Image img = new ImageIcon("img/MalcolmReynolds13.jpg").getImage();
	SpinnerModel stepEntry = new SpinnerNumberModel(1, 1, 300, 1);
	SpinnerModel karmaCounter = new SpinnerNumberModel(25, 0, 25, 1);
	JSpinner stepSpinner = new JSpinner(stepEntry);
	JSpinner karmaSpinner = new JSpinner(karmaCounter);
	
	private JTextField diceResult;
	private JButton myButton;
	
private JCheckBox myCheck;
	private JLabel enterStep = new JLabel("Enter Step Here.");
	
	public static void main(String[] args) {
		ImagePanel panel = new ImagePanel(new ImageIcon("img/MalcolmReynolds13.jpg").getImage());
		JFrame frame = new JFrame("Tarah's Dice Roller Of Awesomeness");
		
			frame.getContentPane().add(panel);
		    frame.pack();
		    frame.setVisible(true);
	}

	public ImagePanel(String img) {
		this(new ImageIcon(img).getImage());
	}

	public ImagePanel(Image img){
		this.img = img;
		Dimension size = new Dimension(img.getWidth(null), img.getHeight(null));
		setPreferredSize(size);
		setMinimumSize(size);
		setMaximumSize(size);
		setSize(size);
		JPanel panel = new JPanel();
		add(panel, "Center");
		myButton = new JButton("Roll The Dice.");
		myButton.addActionListener(this);
		myButton.setBorder(BorderFactory.createLineBorder(Color.black));
		diceResult = new JTextField("Roll Result", 9);
		
diceResult.setBorder(BorderFactory.createLineBorder(Color.black));
		myCheck = new JCheckBox("Use Karma.", false);
		myCheck.setBorder(BorderFactory.createLineBorder(Color.black));
		GridLayout myGrid = new GridLayout(3, 2);
		panel.setLayout(myGrid);
		panel.setBorder(BorderFactory.createLineBorder(Color.black));
		panel.add(enterStep);
		panel.add(stepSpinner);
		panel.add(myButton);
		panel.add(diceResult);
		panel.add(myCheck);
		panel.add(karmaSpinner);
		setVisible(true);
	}

	public void paintComponent(Graphics g) {
		g.drawImage(img, 0, 0, null);
	}
	
	public void actionPerformed(ActionEvent e) {
		boolean useKarma = false;
		middle = (Integer)stepSpinner.getValue();
		System.out.println("actionPerformed() thinks the step number is: " + middle);
		if (myCheck.isSelected() == true) {
			System.out.println("Using Karma.");
			useKarma = true;
			int decrease = ((Integer)karmaCounter.getValue()) - 1;
			karmaCounter.
setValue(decrease);
		}
		String s = Integer.toString(rollTheDice(useKarma, middle, fail));
	    diceResult.setText(s);

	} 

/////////////////////////////////////////////
/////////////////MATHYNESS///////////////////
/////////////////////////////////////////////
	
	//This is the Earthdawn Exploding Dice Method.
	public int d (int die){

		int sides = die;
		int result = 0;
        int roll;
    
		do {
			r = new Random();
            roll = r.nextInt(sides) + 1;
            result = result + roll;
            System.out.println("This is a d" + sides + " roll with result: " + result);
       } while (roll == sides);

		return result;
	}
	
	public int oneToSeven (int o) {
		int result = 0;
		if (o == 1) {
			result = d(six) - 3;
			if (result < 1) {
				result = 1;
			}
		}
		if (o == 2) {
			result = d(six) - 2;
			if (result < 1) {
				result = 1;
			}
		}
		if (o == 3) {
			
result = d(six) - 1;
			if (result < 1) {
				result = 1;
			}
		}
		if (o == 4) {
			result = d(six);
		}
		if (o == 5) {
			result = d(eight);
		}
		if (o == 6) {
			result = d(ten);
		}
		if (o == 7) {
			result = d(twelve);
		}
		return result;
	}
	
	public int prefix (int p) {
		int prefixTotal = 0;

		for (int i=1; i= 8) {
			int d12s = prefix(full);
			int rest = suffix(mod);
			result = d12s + rest;
			
			if (result == full+1) {
				fail = true;
			}
		}
		return result;
	}
	
	public int rollTheDice(boolean addKarma, int stepValue, boolean epicFail) {
		boolean addK = addKarma;
		dice = 0;
		int result = 0;
		result = step(stepValue);
		epicFail = fail;
		if (addK == true) {
			int dK = d(six);
			result = result + dK;
			if (epicFail == true && dK == 1) {
				JOptionPane.showMessageDialog(frame, "Epic FAIL.");
			}
		}
		else if (addK != true && epicFail == true) {
			JOptionPane.showMessageDialog(frame, "Epic FAIL.");
		}
		return 
result;
	}
}

The IDE Wars: NetBeans or Eclipse for Java Software Development

I’ve been working on several applications for a few years; some are ready or released into the wild. I’ve used NetBeans and Eclipse to develop one application in particular; I’ve written an Earthdawn dice roller application. Earthdawn is like Dungeons & Dragons, but for real nerds. The Earthdawn dice system is complex, including a shifting iterated seven-step algorithm for determining the dice rolled for a given action. In addition, dice explode in Earthdawn. That means that if a given die results in its maximum value (i.e. a d6 result is a 6 or a d12 result is a 12), you reroll the dice and add that to the total, continuing to reroll if the die continues to result in its maximum value and stopping when it does not. Plus, you also have the option of adding a karma die (dependent on race, like Elf or Dwarf) to any roll which permits it.

Obviously, this is a complex system, and dealing with the RNG was not the hard part. The hard part was
figuring out the algorithm by which you can calculate the dice you would roll for any given step. For example, rolling a step 10 means that you roll a d8 + d6. Rolling a step 20 means that you roll 2d12 + d10. You can find this on a chart in the 3rd Edition Earthdawn Player’s Guide, but it actually took doing a Taylor series to determine that there is an algorithm which repeats every 7 steps. This means that my app can calculate what you’d roll for a step 63 dice roll, when the book doesn’t provide a chart that high.

I’ve been fiddling with this app for a year or so, and while I’ve been developing the backend in Eclipse, I found that the frontend needed some serious help. I looked around for an IDE specifically to develop the frontend of a Java app, and NetBeans turned out to be full-featured enough to develop in much the same way that I’d dev a C# app in Visual Studio 2010. I’m an old school algorithm coder, and I don’t do as much frontend app development, as opposed to my long term work in
frontend web development. In fact, most of my experience in frontend app development is in VS from 2003 on. So, believe it or not, I was looking for an IDE experience closer to VS.

NetBeans is open source; I found that specifically for the purpose of frontend Java software development, it’s a far better IDE than Eclipse. While Eclipse works better for academic algorithm coding, NetBeans is tailor-made for someone who wants to turn out an app with a backend; in fact, I coded the backend over rather a lot of time in Eclipse to test it with multiple RNGs developed at CERN, Argonne, etc, and simply copied over the relevant classes into NetBeans to hook them up to the frontend. I’d actually recommend this as the most efficient experience if you’re trying to create a complex backend with a simple and effective frontend…especially if you have an app that needs a frontend instead of a script. NetBeans has a simple application package process as well, if you need to pack up the app and send it out. I have
Ubuntu, OpenSUSE, Windows, and Mac users in my group, and Java will execute on each of those platforms.

I’ll also shortly be posting the app so you can examine it for yourselves 😉