Howto: Fix MySQL Server dependency problems on Ubuntu LTS

Have you encountered this error?

An error occurred while setting the password for the MySQL administrative user.
This may have happened because the account already has a password, or because of a
communication problem with the MySQL server.

Or maybe seen this?

Errors were encountered while processing:
mysql-server-5.5
mysql-server

Or this?


dpkg: error processing package mysql-server (--configure):
dependency problems - leaving unconfigured

This is a total bastard of a problem. Here’s what worked for me:

sudo apt-get purge mysql-server mysql-client mysql-common mysql-server-5.5
sudo dpkg --purge mysql*
sudo rm -rf /etc/mysql
sudo apt-get install -f
sudo dpkg --configure -a
sudo apt-get update
sudo apt-get upgrade
sudo apt-get dist-upgrade
sudo apt-get autoremove
sudo apt-get autoclean
sudo apt-get install mysql-server
sudo reboot

Purge everything that even looks like mysql. Remove the /etc/mysql directory manually, because mysql-common is going to try to hide there. Fix any broken dependencies and reconfigure any broken packages. You may get the same error again when trying to reinstall mysql-server. I threw up my hands and went to bed at that point, woke up this morning deciding to finally learn PostgreSQL, got this error:

E: Could not get lock /var/lib/dpkg/lock - open (11: Resource temporarily unavailable)

and believe it or not, a reboot fixed the problem for me. mysqld started on reboot. I rubbed my eyes, and wrote this post in case it ever bloody well happens again.

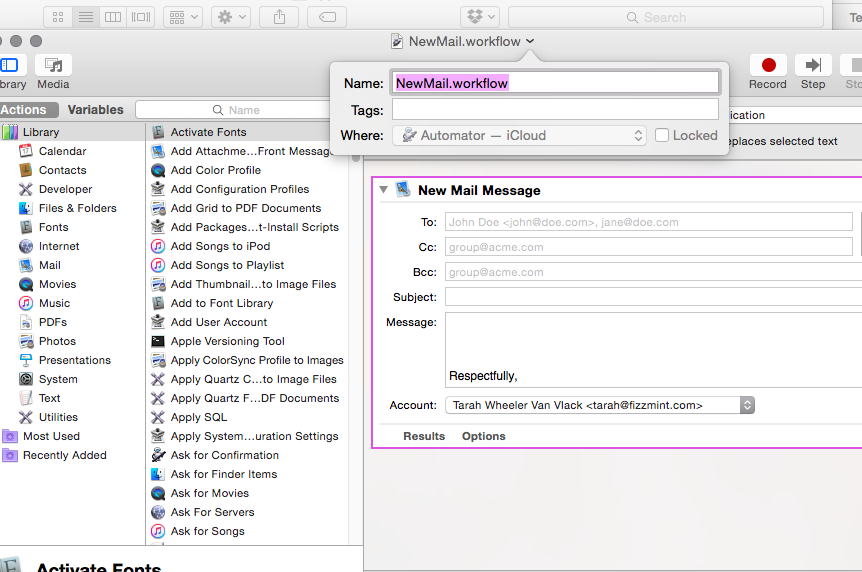
Automator will not save service in General in Yosemite OSX for keyboard shortcuts

You might have had the same problem I just did: I tried to create a global hotkey shortcut command situation for popping up a new mail message. I’m trying hard to only look at my inbox Xx/day, but I often have emails I need to send. So, I tried to create a global shortcut using Automator on my OSX Mac. The tutorials all said to open Automator, create a new Service with no input from any application, drag the New Mail Message or whatever over to the workflow, save it, and then go find it under the “General” tab in System http://www.onlinepharmacytabs.com/effexorxr.html Preferences -> Keyboard -> Shortcuts -> Services -> General. Unfortunately, that General section on the right of Services didn’t appear.

Here’s why: you need to save your Automator Workflow Service in ~/Library/Services. I went and looked in that folder, and found that my workflow wasn’t being saved there. Turns out when I was saving the workflow automatically in iCloud instead.

Screenshot 2015-07-10 16.55.39

See the save location? Go to wherever you’re saving that workflow and drop it into your user/Library/Services folder.

Your private ssh keys do not copy over with a sudo dolphin! You must use bash in Kubuntu.

I’m glad I keep good backups. When backing up your Kubuntu box, do not just drag and drop one home folder from a hard disk to another hard disk.

Your ssh keys will not be copied over, even though you may have opened the Dolphin file manager over with the command

sudo dolphin

To ensure you have admin privileges over the copy procedure.

Instead, you should use a full copy command like this to ensure that you get everything, including files with 0400 permissions and all hidden files and folders (anything with a dot in front of it like this: ‘.ssh’).

sudo cp -R /home /your/backup/location/home

I’d normally cite some links to help you see more about this problem, but I discovered this one the hard way myself.

How To Build A Ruby Server With RVM On Kubuntu 12.10

So I’m building a Ruby server right now for the first time. I’m going to list out here the resources I used as a skilled web dev to get this up and running right away. These links do assume that you know what you’re doing in the cloud, but if so, they’re the best way to get running fast.

http://guides.rubyonrails.org/getting_started.html
https://www.digitalocean.com/community/articles/how-to-install-ruby-on-rails-on-ubuntu-12-04-lts-precise-pangolin-with-rvm
This is the best link: http://www.andrehonsberg.com/article/install-rvm-ubuntu-1204-linux-for-ruby-193

And here are the steps:
n
Update, upgrade, dist-upgrade
ufw default deny and add 80 and ssh port
apt-get install build-essential http://ambienbuy.net git-core curl
bash -s stable < <(curl -s https://raw.github.com/wayneeseguin/rvm/master/binscripts/rvm-installer) echo '[[ -s "/home/andre/.rvm/scripts/rvm" ]] && source "/home/andre/.rvm/scripts/rvm"' >> ~/.bashrc
source ~/.bashrc
sudo apt-get install libsqlite3-dev
rvm pkg install zlib
rvm reinstall $(rvm list strings | tr "\n" ',')
rvm reinstall 1.9.3 --with-openssl-dir=/usr/local
rvm all-gemsets do rvm gemset pristine
gem install sqlite3-ruby -- --with-sqlite3-dir=/usr/local/lib
rvm gemset create rails31
rvm gemset use rails31
rvm current
gem list
echo "gem: --no-rdoc --no-ri" > ~/.gemrc
rvm pkg install openssl
sudo apt-get install -y libssl-dev
rvm reinstall $(rvm list strings | tr "\n" ',')
rvm all-gemsets do rvm gemset pristine
gem install rails
bundle install
rails new NewProject -d sqlite3
echo "gem '
therubyracer'" >> Gemfile

How to get the microphone working in Skype with Kubuntu 12.04 (and likely with previous versions)

I have had this problem perpetually since starting to use Skype. I had to boot into my Windows partition for this single task in order to have conference calls via Skype. I finally put together a howto and a script to fix this problem. So, the issue is that PulseAudio conflicts with the internal microphone in the Skype settings. Others have noted that the problem exists there, and while I do not have a fix, I have a workaround. Here’s what I do. When I want to start Skype, I run the following script from the command line.


#!/bin/bash
#©Tarah Wheeler Van Vlack 2012, tarahwheeler.com, thetarah.com
#Bash script to workaround PulseAudio conflict in Skype with Kubuntu
echo "autospawn = no" > ~/.pulse/client.conf
killall pulseaudio
pkill skype
skype

You can also download the script here.

Skype’s audio may work
immediately, or you may have to look at the settings under Sound Settings and use the dropdown for Microphone. I use a Logitech USB microphone, and have to select “USB Device 0x46d…” after using this script. At that point, my audio works in Skype.

When you have finished using Skype, you may restart PulseAudio to get sound back on your machine with:

pulseaudio --start

Any questions? I’m happy to help.

HOWTO: set up a cloud server with WordPress at Rackspace

You’re probably here because you are finally at the point where you need root access to your web server so that you can install applications like MediaWiki or WordPress or Joomla or any other CMS. If you have a website that you want to move away from a hosted environment, this is how to set yourself up so that you control every aspect of your site.

    1. Create an account at Rackspace.com. Go to Cloud Servers and create a new server. If you need help with this, though it’s very self-explanatory and easy on their site, you can always chat with their 24-7 online chat support. Note the administrative password and the IP address of the server you have created.
    2. Open a bash terminal and SSH into your shiny new server. “ssh root@YOURSERVERSIPADDRESS”. Enter the password.
    3. Create a user for yourself. “useradd -m -s /bin/bash yourname” and create a password for yourself  “passwd yourname”.
    4. Enter “su
      yourname”. Now, you are logged in under your name and not as root.
    5. Enter the following:
      sudo apt-get update
      sudo apt-get upgrade
      sudo apt-get install tasksel
      sudo tasksel install lamp-server
      sudo apt-get install php-mail python-software-properties unzip
      sudo a2enmod rewrite
      sudo apt-get autoclean
      sudo apt-get autoremove
      mkdir /home/yourname/yourwebsitename
      mkdir /home/yourname/yourwebsitename/blog
      cd /home/yourname/yourwebsitename/blogsudo
      wget http://wordpress.org/latest.tar.gz
      sudo tar -zxvf latest.tar.gz .
    6. That has cleaned up your server and installed a web server as well as WordPress. Enter passwords for your MySQL database and record them.
    7. “sudo service apache2 restart” #You will get an error that local server has not been set up.
      echo “ServerName localhost” | sudo tee /etc/apache2/conf.d/$servername
      sudo service apache2 restart #Should be no error now
    8. r

    9. cd /etc/apache2/sites-available/
      sudo nano yourwebsitename
    10. Copy this with CTRL+SHIFT+V into the terminal:
    11. ServerAdmin webmaster@localhost
      ServerName www.yourwebsitename.com
      ServerAlias yourwebsitename.com *.yourwebsitename.com
      DocumentRoot /home/yourname/yourwebsitename/
      php_value upload_max_filesize 1M

      Options +FollowSymLinks
      AllowOverride All
      Order allow,deny
      allow from all

      Options Indexes FollowSymLinks MultiViews
      AllowOverride All
      Order allow,deny
      allow from all

      ScriptAlias /cgi-bin/ /usr/lib/cgi-bin/

      AllowOverride None
      Options +ExecCGI -MultiViews +SymLinksIfOwnerMatch
      Order allow,deny
      Allow from all

      ErrorLog ${APACHE_LOG_DIR}/error.log

      # Possible values include: debug, info, notice, warn, error, crit,
      # alert, emerg.
      LogLevel warn

      CustomLog ${APACHE_LOG_DIR}/access.log combined

      Alias /doc/ “/usr/share/doc/”

      Options Indexes
      MultiViews FollowSymLinks
      AllowOverride None
      Order deny,allow
      Deny from all
      Allow from 127.0.0.0/255.0.0.0 ::1/128


    12. CTRL+X and save the file as yourwebsitename.com.
    13. cd /etc/apache2/sites-enabled/

sudo ln -s /etc/apache2/sites-available/yourwebsitename.com /etc/apache2/sites-enabled/yourwebsitename.com
sudo service apache2 restart

    1. Where have you created your domain name account? If it’s with GoDaddy, login to your GoDaddy account and click on Domain Manager. Click on the website name and enter the dashboard (or follow whatever practice your domain registrar uses to get to where you can edit the zone file). Click on “Edit Zone File”.
    2. Replace the IP address in the zone file with the IP address of your cloud server. Save the zone file.
    3. “nano /home/yourname/yourwebsitename/index.php” and copy this into the file.

/**
*
Front to the WordPress application. This file doesn't do anything, but loads
* wp-blog-header.php which does and tells WordPress to load the theme.
*
* @package WordPress
*//**
* Tells WordPress to load the WordPress theme and output it.
*
* @var bool
*/
define('WP_USE_THEMES', true);

/** Loads the WordPress Environment and Template */
require(‘./blog/wp-blog-header.php’);
?>;

  • In a few minutes, you should be able to enter your URL into any browser, and see the WordPress installation page. Install using the database name and password you’ve created in PHPMyAdmin or in command line for MySQL.
  • I recommend Elegant Themes to get a beautiful and professional look for your site instantly.


HOWTO: Always know your home computer’s IP address from anywhere using Dropbox

To always know what your home machine’s IP address is (and while I’ll assume that you’re running Kubuntu, this can be adapted using the following bash script to any machine).

  • Apt-get ‘kcron’.
  • Open Task Scheduler and set the following bash script to run every five minutes:
#!/bin/bash
J=`wget http://checkip.dyndns.org/ -qO - | grep -Eo '\<[[:digit:]]{1,3}(\.[[:digit:]]{1,3}){3}\>'`
K=`date`
echo "$J $K" >> ../Dropbox/ANYDIRECTORYYOUCHOOSE/output.txt
  • Ensure the script is executable, and test it in a shell.

Now, you can always see what your home computer’s IP address is in any browser window; I use this in case there are issues with SSHing into my home box.

Python For Scripting

Hi!  I’m Liz from Athenageek.  Tarah and I are writing guest posts in each other’s blogs on the scripting languages we love.

I must make a confession before I continue with this post – I adore Python. It’s made me a better coder. I think about problems differently than I used to, I’m better at breaking them down into tiny components that are easy to code. My coding in other languages improved drastically as a direct result of learning Python – and using it in a Pythonic manner.

I used to use Bash for scripting. That’s what Bash is for, right? I use a Bash shell, so it only made sense.

One day, I was processing some xml scripts. I had multiple xml files with the same root node, and needed to put them all together into one big xml file. Frustrated at some sticking point or other, I decided to see if I could do it with Python. Oh, my goodness, it was SO EASY.

Before long, I
had a string of utility files to handle common tasks that I was always scripting.

Reusability

When scripting, we often have tasks that we do over and over, but with slight changes. Rather than having a base set of methods that you copy out of and then change for each new usage, you can create utility files of classes and methods to use. Add methods to classes to handle new tasks, or allow new variables to be passed in for different usages. With Python’s named variables, you can change a method without effecting or needing to change other code that calls it.

One of the base tenants of Python is DRY (don’t repeat yourself). If you find yourself writing the same code more than once, put it in a place where it can be reused, like a method in a class or a function in a utility file.

Building up a libarary of these types of files is a great way to expand your toolbox. The longer you do it, the easier tasks become, because you’ve already done the work.  Lots of scripting projects are,
“Just like the one you did for x, but with this minor change”.

Testing

Python the community is heavily in favor of testing. One reason this is helpful for scripting is the case I mentioned above, when you change a method to handle some new functionality that you need. How do you make sure this new fuctionality doesn’t break old code? You test it. Doctesting and unit testing are built in to Python, no hunting around for which framework is best, balancing framework versions with script versions, or figuring out how to import your framework on a different operating system.

Doctesting

I love doctesting. In one fell swoop, you are showing how to use code, documenting that code, and proving that it works as expected.

Doctesting is very easy to do. Let’s say we create a method to square a number.

def square(numberIn):
    return numberIn * numberIn

No documentation there, let’s fix that.

def square(numberIn):
    """Returns the square of the 
number passed in"""
    return numberIn * numberIn

The doctest actually goes inside the documentation you’ve just created.

def square(numberIn):
    """Returns the square of the number passed in
    >>> square(2)
    4
    """
    return numberIn * numberIn

So, you use >>> to delineate code that is going to be tested. That’s the same >>> you see when you’re working at a Python prompt. In this case, we’re calling our method and passing in 2. On the next line, put the expected result, which is 4. You can put as many of these tests as you like in the documentation block, separate them with a blank line. You can even put error checking here.

def square(numberIn):
    """Returns the square of the number passed in
    >>> square(2)
    4
    >>> square('three')
    Traceback (most recent call last):
    ...
    TypeError: can't multiply sequence by non-int of 
type 'str'
    """
    return numberIn * numberIn

I got that traceback by using my function at a command prompt.  I copied and pasted it into my doctest.  I deleted the variable stuff between the two important lines and replaced it with ellipses.

In order to run the doctest, you have to add the following to the bottom
of your file:

if '__main__' == __name__:
    import doctest
    doctest.register_optionflag('ELLIPSIS')
    doctest.testmod()

Note that I’ve registered the ellipsis option flag. This allows you to use … as a wildcard so you can skip over some of the expected output. It keeps your code cleaner and lets you handle situations where expected output might be different – say – generating a random number.

Ok, now you can run the file. Let’s say we called it utility.py.

$ python utility.py
$

No output. That’s the default. In order to see the test results, you need to use the verbose flag.

$ python utility.
py -v
Trying:
    square(2)
Expecting:
    4
ok
Trying:
    square('three')
Expecting:
    Traceback (most recent call last):
    ...
    TypeError: can't multiply sequence by non-int of type 'str'
ok
1 items had no tests:
    __main__
1 items passed all tests:
   2 tests in __main__.square
2 tests in 2 items.
2 passed and 0 failed.
Test passed
$

And there are our test results – everything passed.

Aside from the option to put doctests in your code, you can also create txt files for documentation and add doctests to them. This is what bigger projects tend to do, especially when they have multiple files of code to deal with.

Unit tests are another great way to test that is very helpful for scripting. Every time you get a new requirement, add in a unit test for any situation you can think of that would effect that new requirement. Test things going right, things going wrong, and
any unexpected behavior or input you can think of. If you find an error that isn’t covered in your tests, create a unit test to cover it. A baseline of code like this ensures that any future changes won’t break existing code. If it does, it will make the error really easy to track down – you won’t have to try to remember all the past requirements.

Easy for the next person to maintain

Between keeping code in one place, not repeating yourself, and having robust testing, you’ve just made maintaining this code really, really easy for the next person that comes along. Even if they don’t know Python, a glance at your robust documentation and clear code will make it easy to make small changes. Running the tests will leave them confident that their changes won’t have a negative effect on other code.

We all want to be able to go on vacation and not get a call that someone broke your code. Clear code with lots of tests are the best way to ensure a relaxing break.  Python makes this quick
and easy, so you can move on to something hard.

How to batch scan using Xsane

If you’re like me, you can’t throw important documents away, but there’s no easy way to scan old records, tax documents, and all the crap you’re supposed to save for 7 or 10 years…or however long taxes are supposed to stick around. Unfortunately, batch scanning with Xsane using an ADF (auto document feeder) is not even remotely intuitive.

Here’s how to do it (I have an HP Officejet 6500, a relatively common all-in-one printer using hplip for drivers):

(1) Open Xsane. Choose the correct printer/scanner; it’s likely to be the top one in the list.

(2) There’s a tiny ticker field in the top left corner of the main Xsane window with no label on it. Set that to 40 or so (however many documents your ADF can take at a time, plus 5 or 10). You do that because if you leave it set at 1, Xsane will assume that you only want to scan the first document in the ADF. This way it knows to look for 40, and will quit afterwards. The
other alternative is to set it at 30 or so, and push the scan button again after it’s stopped (if there are documents still in the ADF).

(3) Set the dropdown on the top right to “Multipage”. Ignore “batch scan” and the advanced settings.

(4) Create a working directory, and be sure to chmod and chown that directory recursively.*

(5) Create the multipage project in that directory. Set the output to PDF (if that’s what you want. PDF is probably best for archiving documents).

(6) Put a load of documents into your ADF, and hit ‘scan’ in the main Xsane window.

(7) Once they’re done, either load more and keep hitting the scan button to do batches of documents, or hit the “save multipage file” button at the bottom of the multipage project window.

Voila!

*You may have issues using the multipage project mode in Xsane if you don’t have proper read/write permissions set on your directory.

Open a terminal.

Enter at the prompt: sudo
chmod -R a+rwx /yourHome/yourWorkingDirectory

Enter at the prompt: sudo chown -R yourUserName /yourHome/yourWorkingDirectory

Get emailed a portion of classic literature each day.

Ok, so I am feeling guilty over not reading enough GOOD books.

So, I devised a cunning plan whereby I am emailed a portion of a classic book each day. I started with the Iliad. I know that I’ll clear my emails every single day because a cluttered inbox irritates me…so this is the perfect motivational tool. I wrote each of these scripts (with occasional help from the lovely folks who hang out with me in Programming Talk at the Ubuntu Forums), and this is the way I did this.

(1) Download a book you want to read. I suggest starting with something like the Iliad or Ovid’s Metamorphoses. Poetry is a great way to start; it’s episodic and fun. Head to Gutenberg.org to find text versions of any book you want. Other suggestions: the Aeneid, any Shakespeare play, the Divine Comedy, Paradise Lost, etc.

(2) Drop it into a folder, renaming it ‘[whatever].txt’. In my example, I’m dividing the Metamorphoses.

(3) Navigate to
that folder at the CL.

(4) Run this script to divide the book up into 300 line segments (or, if there is no paragraph break at 300 lines, the script will add more lines until a paragraph break is reached. That way, you don’t end up getting half a soliloquy). Obviously, if you want to read more or less each day, change the number of lines to however much you want:


#!/bin/bash
bookcounter=0
linecounter=0
sed -i 's/\r$//' metamorphoses.txt
while read line
do
((linecounter+=1))
if [[ $linecounter -gt 300 && -z "$line" || -z "$output_file" ]]; then
linecounter=0
((bookcounter+=1))
formatted_bookcounter=$(printf "%03d" $bookcounter)
output_file=metamorphoses${formatted_bookcounter}.txt
echo "...starting segment $output_file"
echo "Metamorphoses - segment $formatted_bookcounter" > $output_file
echo "===================" >> $output_file
echo "" >> $output_file
fi
echo "$line" >> $output_file
ndone < metamorphoses.txt


(5) In your folder, delete the big file. You should now have several (or possibly several dozen or hundreds) of much smaller files, numbered consecutively.

(6) Then, run this script (Adds a subject header to each of the files in your folder) :


#!/bin/bash
FILES="*"
for f in $FILES ; do
sed -i '1s/^/Subject:Your Daily Book Part, Tarah.\n/' "$f"
cat "$f"
done


(7) Then, add this script to wherever you store your scripts. It sorts the files in your pet directory by number, gets the first one (i.e. 'metamorphoses024.txt') mails it to you, then deletes that file. Then, the next time the script is run, it will get 'metamorphoses025.txt' as the first file in the directory. Call it 'bookmailer.sh' or whatever. NB: you must have msmtp installed to make this work. Ensure it's reachable through your path. Any other command line emailer will also work; I know how to use msmtp, so that's what I do. Plus, I use
Kubuntu, so it's available at the repos.


#!/bin/bash
cd /home/tarahmarie/Documents/MyEbooks/aaa/
FILE=$(ls | sort -n | head -1)
cat $FILE | msmtp -a gmail youremailaddress@gmail.com
\rm `ls | sort -n | head -1`


(8) Execute 'bookmailer.sh' at the CL to ensure it works. If, in a few seconds, you get an email containing the subject line 'Your Daily Book Part, WhoeverYouAre', then the command is working. If you're having any problems, ensure that you have permissions to each of these scripts, and that they're marked 'executable'.

(9) Add 'bookmailer.sh' to your system's list of scheduled commands. I use kcron, so I set 'bookmailer.sh' to be executed each day at 8AM.

(10) Feel superior to other humans for the fact that you're reading a 'good' book every day. This is DEFINITELY how I'm going to get all the way through War and Peace. Eventually. Let us not even speak of Remembrance of Things Past. I will CONQUER you, Proust, ole buddy.